
Craftsman Pressure Washer Instructions: A Comprehensive Guide

Welcome! This guide provides detailed instructions for operating and maintaining your Craftsman pressure washer, ensuring optimal performance and longevity for years to come.
Craftsman pressure washers are renowned for their robust construction and reliable performance, making them a popular choice for homeowners tackling a variety of cleaning tasks. From revitalizing faded siding to preparing surfaces for painting, these machines offer a powerful and efficient cleaning solution.
Understanding the capabilities of your Craftsman pressure washer is key to achieving optimal results while ensuring safety. These machines utilize high-pressure water streams to dislodge dirt, grime, and debris from various surfaces. Different models cater to diverse needs, ranging from light-duty cleaning around the house to heavy-duty tasks like driveway restoration.
This comprehensive guide will walk you through every aspect of using your Craftsman pressure washer, from initial setup and operation to essential maintenance procedures. We’ll cover safety precautions, component identification, nozzle selection, and effective cleaning techniques, empowering you to confidently tackle any cleaning challenge.
Safety First: Essential Precautions
Prioritizing safety is paramount when operating a Craftsman pressure washer. The high-pressure water stream can cause serious injury if misused. Always read and understand the owner’s manual before operation. Never point the wand at yourself or others. Maintain a safe distance from children, pets, and bystanders during use.
Be acutely aware of your surroundings and ensure a stable footing while operating the machine. Avoid using the pressure washer on unstable surfaces or in wet conditions that could create a slip hazard. Inspect the hose for any damage before each use, and never attempt to repair it yourself – replace it immediately if compromised.
Electrical safety is crucial for electric models; use properly grounded outlets and avoid operating in standing water. Gas-powered models require adequate ventilation to prevent carbon monoxide poisoning. Following these precautions will help ensure a safe and productive cleaning experience.
Personal Protective Equipment (PPE)
Protecting yourself from potential hazards is vital when using a Craftsman pressure washer. Always wear appropriate Personal Protective Equipment (PPE). Safety glasses or goggles are essential to shield your eyes from debris and splashing water. Closed-toe shoes are a must to protect your feet from accidental sprays and falling objects.
Consider wearing gloves to protect your hands from the cold water and potential chemical exposure if using detergents. Ear protection is recommended, especially with gas-powered models, due to engine noise. Long pants and a long-sleeved shirt can offer additional protection against accidental spray.
Proper PPE minimizes the risk of injury and ensures a more comfortable cleaning experience. Ignoring these recommendations could lead to eye damage, skin irritation, or other preventable harm. Prioritize your safety with every use!
Electrical Safety Considerations
When operating an electric Craftsman pressure washer, strict adherence to electrical safety guidelines is paramount. Always ensure the power cord is in good condition, free from cuts or damage; Never use the pressure washer with a frayed or damaged cord. Utilize a Ground Fault Circuit Interrupter (GFCI) outlet or extension cord – this crucial safety feature immediately cuts power in the event of a ground fault.
Avoid operating the pressure washer in standing water or wet conditions to prevent electric shock. Keep the power cord away from the spray nozzle and any water streams. Never attempt to modify the plug or use adapters. Ensure the outlet voltage matches the pressure washer’s requirements. Disconnect the power cord when not in use or before performing maintenance.
Avoiding Damage to Surfaces
Pressure washing, while effective, can damage surfaces if not approached carefully. Always start with the lowest possible pressure setting and test on an inconspicuous area first. Maintain a safe distance – generally, at least two feet – between the nozzle and the surface being cleaned. Avoid directing the spray directly onto delicate materials like painted wood, vinyl siding, or car finishes.
Utilize wider-angle nozzles (25 or 40 degrees) for these surfaces. Be particularly cautious with older or weathered surfaces, as they are more susceptible to damage. Never use a 0-degree nozzle on anything other than concrete or heavily soiled areas. Consistent, sweeping motions are preferable to concentrated blasts of water. Remember, prevention is key to preserving your property’s appearance!
Understanding Your Craftsman Pressure Washer Model
Familiarizing yourself with your specific Craftsman pressure washer model is crucial for safe and effective operation. Each model boasts unique features and capabilities. Before you begin, locate the model number – typically found on a sticker near the pump or engine. This number is essential when referencing the owner’s manual or seeking support.
The manual provides detailed diagrams, troubleshooting tips, and specific instructions tailored to your unit. Understanding key specifications like PSI (pounds per square inch) and GPM (gallons per minute) will help you choose the appropriate settings for various cleaning tasks. Knowing these values ensures you’re using the correct power for the job at hand, maximizing efficiency and minimizing risk.
Identifying Key Components
Let’s break down the essential parts of your Craftsman pressure washer. The high-pressure hose delivers water to the spray wand. The spray wand itself allows you to direct the water stream, and accepts various nozzles for different cleaning patterns. The pump is the heart of the system, generating the necessary pressure.
You’ll also find a water inlet for connecting to your water source, and an outlet for waste water. Gas-powered models include an engine, fuel tank, and recoil starter, while electric models have a motor and power cord. Familiarize yourself with the pressure adjustment knob, and the on/off switch. Knowing these components will aid in setup, operation, and maintenance.
Reading the Model Number & Manual
Locating your pressure washer’s model number is crucial for accessing specific information. It’s typically found on a sticker affixed to the unit’s housing, often near the pump or engine. This number unlocks access to the correct owner’s manual, available on the Craftsman website or through customer support.

The manual contains detailed diagrams, troubleshooting tips, and safety guidelines tailored to your exact model. Always consult the manual before operation, paying close attention to recommended pressures, nozzle usage, and maintenance schedules. Ignoring the manual can lead to damage or injury. Understanding your model’s specifications ensures safe and effective cleaning.
Pressure (PSI) and Flow Rate (GPM) Explained
Pressure, measured in pounds per square inch (PSI), determines the force of the water stream. Higher PSI equates to more cleaning power, ideal for stubborn grime. However, excessive pressure can damage surfaces. Flow rate, measured in gallons per minute (GPM), indicates the volume of water delivered.
Higher GPM means faster cleaning, as it rinses away debris more efficiently. A balance between PSI and GPM is essential. A high PSI with low GPM might struggle to remove large areas of dirt, while low PSI with high GPM may not provide sufficient cleaning force. Consider the task at hand when evaluating these specifications.
Setting Up Your Pressure Washer
Proper setup is crucial for safe and effective operation. Begin by selecting a level surface near a grounded electrical outlet (for electric models) or a well-ventilated area (for gas models). Ensure the area is free from obstructions. Before connecting anything, thoroughly inspect all hoses for cracks or damage.
Next, carefully connect the water supply to the pressure washer’s inlet, ensuring a tight seal to prevent leaks. Then, securely attach the high-pressure hose to both the pressure washer and the spray gun. Finally, connect the chosen spray wand and nozzle, verifying they click firmly into place. Double-check all connections before proceeding.
Connecting the Water Supply
Begin by ensuring your water source provides at least the minimum flow rate specified in your pressure washer’s manual – typically around 2.5 gallons per minute. Attach the water inlet adapter (usually a garden hose adapter) to your garden hose. Then, firmly screw the other end of the adapter into the water inlet port on the pressure washer.
Fully open the water supply valve to allow water to flow freely. Check for any leaks at the connection points and tighten as needed. Avoid using a water source with a severely reduced flow rate, as this can damage the pump. Never draw water from sources contaminated with chemicals or oil.
Attaching the High-Pressure Hose
First, locate the high-pressure hose and ensure it’s free from kinks or damage. Carefully align the hose fittings with the corresponding ports on both the pressure washer pump and the spray gun. Hand-tighten the connections securely – do not use tools, as this can overtighten and damage the fittings.
Double-check that the connections are snug and leak-free before proceeding. A loose connection can result in reduced pressure and potential injury. Always inspect the hose for wear and tear before each use, replacing it if necessary. Never attempt to repair a damaged high-pressure hose; replacement is the only safe option.
Connecting the Spray Wand and Nozzles
Begin by securely attaching the spray wand to the trigger gun, usually with a quick-connect mechanism – listen for a click to confirm it’s locked in place. Next, select the appropriate nozzle for your cleaning task. Gently push the chosen nozzle onto the wand’s nozzle receiver; again, a click indicates a secure connection.

Ensure the nozzle is firmly attached before operation to prevent it from detaching during use. Periodically check the nozzle connection, especially during extended cleaning sessions. Avoid forcing the nozzle onto the wand, as this could damage the threads. Remember to always disconnect the nozzle before storing the wand.
Choosing the Right Nozzle for the Job
Selecting the correct nozzle is crucial for effective and safe pressure washing. Different nozzles deliver varying spray angles and intensities, suited for diverse surfaces. A narrower angle concentrates the spray for powerful cleaning, while a wider angle provides gentler coverage. Always start with a wider angle nozzle and gradually decrease it if more cleaning power is needed.
Consider the surface material; delicate surfaces require wider angles to prevent damage. Experiment in an inconspicuous area first to assess the nozzle’s effect. Incorrect nozzle selection can lead to etching, stripping paint, or other unwanted results. Refer to the nozzle color-coding system for quick identification and appropriate usage.
0-Degree Nozzle: For Intense Cleaning (Use with Caution!)
The 0-degree nozzle delivers an extremely concentrated, pencil-thin stream of water, generating the highest pressure. This makes it ideal for tackling stubborn, stuck-on grime like hardened grease, rust, or heavily soiled areas. However, extreme caution is paramount! Due to its intensity, it can easily damage surfaces – etching wood, stripping paint, or even causing concrete to erode.
Never use this nozzle on painted surfaces, vehicles, or delicate materials. Maintain a significant distance from the cleaning surface, and always test in an inconspicuous area first. Proper technique involves sweeping motions, avoiding prolonged focus on a single spot. Consider it a specialized tool for very specific, durable surfaces only.
15-Degree Nozzle: For General Cleaning
The 15-degree nozzle strikes a balance between cleaning power and surface safety, making it a versatile choice for a wide range of tasks. It produces a more focused spray than wider nozzles, effectively removing dirt, grime, and mildew from most exterior surfaces. This nozzle is excellent for cleaning siding, fences, brick, and concrete, offering substantial cleaning ability without the risk of severe damage.
It’s a good starting point for many cleaning projects, allowing you to assess the level of dirt and adjust accordingly. Maintain a moderate distance from the surface and use sweeping motions for even cleaning. While powerful, it’s still advisable to test in an inconspicuous area before tackling large surfaces, especially if they are painted or delicate.
25-Degree Nozzle: For Delicate Surfaces
The 25-degree nozzle is your go-to option when cleaning surfaces that require a gentler touch. It delivers a wider spray pattern with reduced pressure, minimizing the risk of damage to softer materials like painted wood, vinyl siding, or even automotive finishes. This nozzle excels at removing light dirt, dust, and cobwebs without causing etching or stripping.
Use it for washing cars, boats, and outdoor furniture. Maintain a slightly closer working distance than with more aggressive nozzles, but always test a small, hidden area first. Consistent, sweeping motions are key to achieving a thorough clean without causing harm. Remember, patience and a less forceful approach are crucial when working with delicate surfaces.
40-Degree Nozzle: For Wider Coverage & Light Cleaning
The 40-degree nozzle provides the widest spray pattern and lowest pressure, making it ideal for large areas and light-duty cleaning tasks. It’s perfect for rinsing away loose debris, applying detergents, or gently cleaning broad surfaces like patios, decks, and fences. Because of its low impact, it’s also suitable for washing windows and screens without causing streaks or damage.
This nozzle allows you to cover more ground quickly, reducing cleaning time; Maintain a closer working distance for effective cleaning, and utilize overlapping strokes for consistent results. It’s an excellent choice for pre-rinsing before using a more focused nozzle, or for a final rinse after applying cleaning solutions. Remember to always test in an inconspicuous area first!

Starting and Operating Your Pressure Washer
Before starting, double-check all connections – water supply, hose, and nozzles – ensuring they are secure. For gas-powered models, verify the oil level and fuel tank. Electric models require a grounded outlet. Always refer to your specific model’s manual for detailed starting procedures.
Once connected, prime the pump according to the manual’s instructions; this removes air and ensures proper water flow. Start the engine (gas) or plug in the unit (electric). Gradually increase the pressure setting, starting low to avoid damage. Maintain a safe distance from the surface you’re cleaning and use sweeping motions. Never point the wand at yourself or others!
Priming the Pump
Priming the pump is crucial for initial startup and after periods of inactivity, as it removes air from the water intake line. Most Craftsman pressure washers feature a priming button or port, typically located near the pump itself. Turn the power switch to the “on” position (for electric models) or start the engine (for gas models).
Press and hold the priming button, or open the priming port, until a steady stream of water flows from the spray gun. This may take several attempts. Ensure the water supply is fully turned on with adequate pressure. If priming fails after multiple tries, check for kinks in the water hose or obstructions in the water inlet filter. Proper priming ensures efficient operation and prevents pump damage.
Starting the Engine (Gas Models) / Plugging In (Electric Models)
For Gas Models: Ensure the fuel valve is open and the choke is set to the ‘start’ position. Pull the starter cord firmly and repeatedly until the engine ignites and runs smoothly. Gradually adjust the choke as the engine warms up. For Electric Models: Verify the power switch is in the ‘off’ position before plugging the unit into a grounded outlet. Use a heavy-duty extension cord if needed, ensuring it’s rated for outdoor use.

Always double-check all connections before powering on. Never operate the pressure washer in enclosed spaces. Be aware of the recoil starter on gas models and maintain a firm grip. Confirm the engine or motor is running correctly before proceeding to adjust pressure settings.
Adjusting Pressure Settings
Most Craftsman pressure washers feature adjustable pressure settings, typically controlled by a knob or dial. Start with the lowest pressure setting and gradually increase it as needed for the specific cleaning task. Testing on an inconspicuous area is crucial to avoid damage. Higher pressure is suitable for tough grime on durable surfaces like concrete, while lower settings are ideal for delicate materials like painted wood or vehicles.
Understand that increasing the pressure also increases the force of the water stream. Incorrect pressure settings can lead to surface etching or damage. Refer to your model’s manual for specific guidance on pressure adjustment. Regularly check the pressure gauge, if equipped, to maintain consistent cleaning power.
Cleaning Techniques & Applications
Craftsman pressure washers are versatile tools for numerous cleaning tasks. For vehicles, use a wider nozzle (25 or 40-degree) and maintain a safe distance to avoid paint damage. Driveways and patios benefit from a 15 or 25-degree nozzle, working in overlapping strokes. Always test a small area first!
To remove mold and mildew from siding, employ a low-pressure setting with a detergent solution applied via a siphon tube or foam cannon. Rinse thoroughly from top to bottom. Remember to always wear appropriate PPE. Experiment with nozzle angles and distances to achieve optimal results, and consult your manual for specific recommendations based on your model.
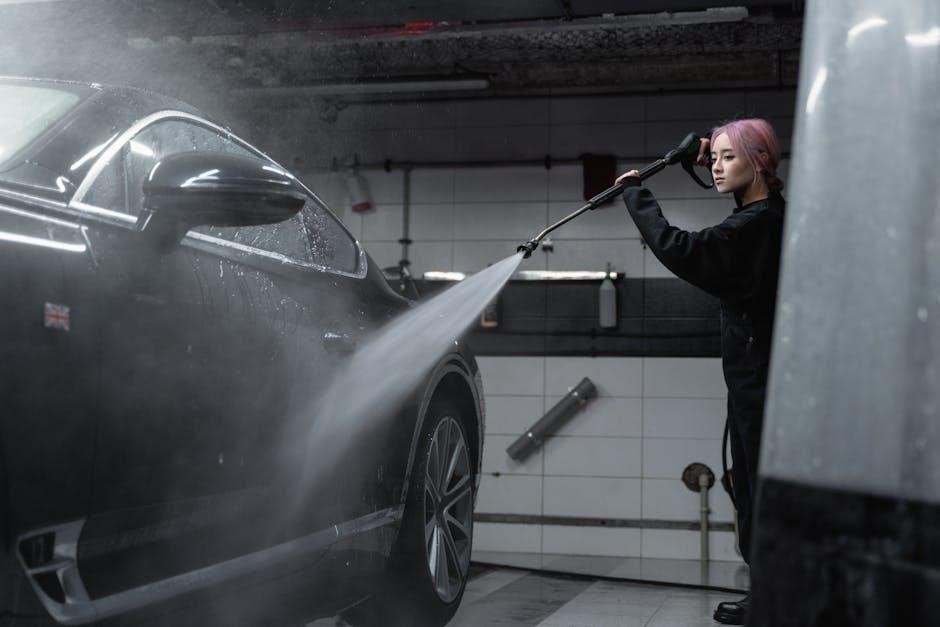
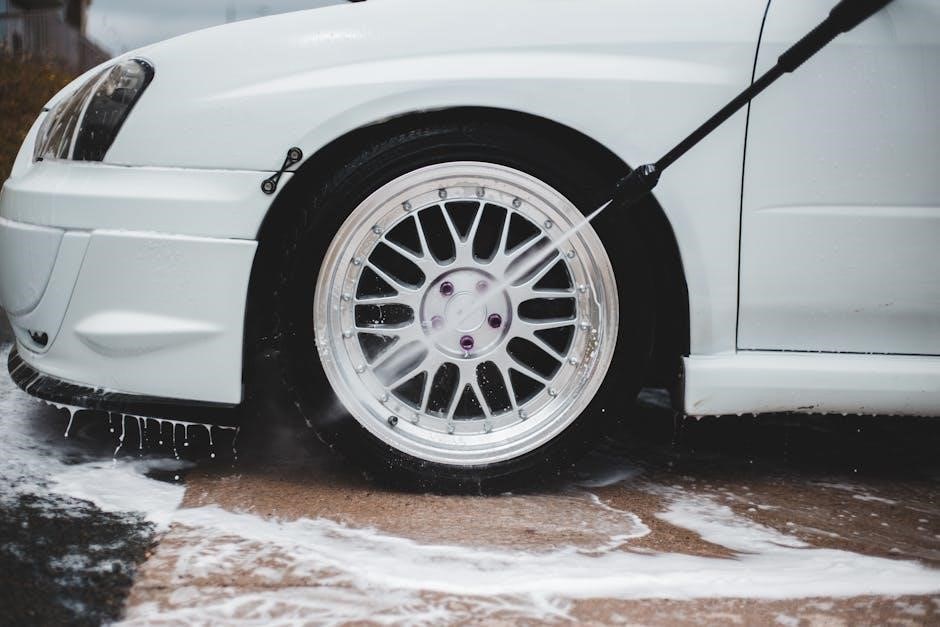
Washing Cars & Trucks
When washing vehicles with your Craftsman pressure washer, prioritize a gentle approach to protect the paint. Always begin by rinsing away loose dirt and debris with a wide-angle nozzle, such as the 25 or 40-degree option. Maintain a distance of at least two feet from the vehicle’s surface.
Utilize a low-pressure setting and consider using a dedicated car wash soap formulated for pressure washers, applied through the siphon hose. Avoid directing the spray at sensitive areas like windows, seals, and electrical components. Rinse thoroughly, working from top to bottom, and finish with a soft cloth to dry, preventing water spots.
Cleaning Driveways & Patios
Driveways and patios often accumulate stubborn dirt, grime, and algae. Your Craftsman pressure washer is ideal for tackling these surfaces! Start with a wider nozzle, like the 25-degree, to remove loose debris. Gradually move to a 15-degree nozzle for more ingrained dirt, maintaining a safe distance – around 8-12 inches – to avoid damage.
Employ sweeping motions, overlapping each pass to ensure even cleaning. For oil stains, a dedicated concrete degreaser applied before pressure washing can significantly improve results. Be cautious with older or cracked concrete, as high pressure can cause further deterioration. Always rinse thoroughly, working in sections, and allow the surface to dry completely.
Removing Mold & Mildew from Siding
Mold and mildew can quickly discolor and damage your home’s siding. Your Craftsman pressure washer, used correctly, can restore its appearance! Begin by applying a siding-specific mildewcide or cleaning solution, following the manufacturer’s instructions carefully. Allow the solution to dwell for the recommended time – typically 5-10 minutes – but don’t let it dry.
Utilize a 25-degree or 40-degree nozzle, maintaining a distance of at least 12-18 inches from the siding. Work from the bottom up to prevent streaking, using consistent, overlapping strokes. Avoid directing the spray directly upwards under the siding, as this can force water behind it. Rinse thoroughly with clean water and inspect for any remaining mold, repeating the process if necessary.
Maintenance and Storage
Regular maintenance extends the life of your Craftsman pressure washer. Always flush the system with clean water after each use to remove detergent and debris, preventing corrosion. Inspect the high-pressure hose for cracks or damage, and replace it if needed. Clean nozzles regularly with a nozzle cleaning tool to ensure proper spray patterns.
For storage, drain all water from the pump and hose. Add pump protector (follow product instructions) to prevent internal damage during freezing temperatures. Store the unit in a dry, protected area, away from extreme temperatures. If storing for extended periods, consider disconnecting the battery (gas models) or wrapping the electrical cord securely (electric models).
Flushing the System After Use
Properly flushing your Craftsman pressure washer after each use is crucial for longevity. Disconnect the water supply and attach a low-pressure nozzle, like the 40-degree nozzle. Start the pressure washer and run it for approximately 30-60 seconds, allowing clean water to purge any remaining detergent or debris from the pump, hose, and wand.

Continue running until the water exits clear and free of suds. This prevents buildup that can cause corrosion and damage internal components. For detergent-based cleaning, use a dedicated flushing attachment if available. Ensure you flush thoroughly, especially if using harsh chemicals. Turn off the unit and disconnect the water supply when finished.
Cleaning Nozzles and Filters
Regularly cleaning your Craftsman pressure washer’s nozzles and filters maintains optimal performance. Clogged nozzles reduce pressure and create uneven spray patterns. Remove nozzles and inspect for debris; use a nozzle cleaning tool or a thin wire to clear any blockages. Filters prevent contaminants from entering the pump, so check and clean them frequently.
Locate the water inlet filter and remove it carefully. Rinse the filter under running water, removing any sediment or particles. For stubborn debris, use a soft brush. Inspect the filter for damage and replace if necessary. A clean filter and unobstructed nozzles ensure efficient operation and extend the life of your pressure washer.
Winterizing Your Pressure Washer
Proper winterization is crucial to prevent freeze damage to your Craftsman pressure washer. Begin by disconnecting the water supply and high-pressure hose. Next, run the engine (gas models) or power (electric models) with the pump engaged until all water is expelled from the system – use a pump saver kit if available.
Drain the pump oil (gas models) and replace it with fresh oil. Remove and clean or replace the spark plug. For electric models, ensure the power cord is dry and stored safely. Store the pressure washer in a dry, protected location, ideally indoors. Following these steps will ensure your machine is ready for spring!